Crafting Ironclad Security: An Introduction to JWT Authentication in Django

A dumb AI Engineer.
In the superfast paced world of software development, ensuring the security of the system or the application is cardinal and paramount. Most of the applications we build are, for obvious reasons, concerned with the data and data, in the contemporary world, is very critical. So, we need to ensure that the critical data we store, such as patients' data in med-tech applications, students' data in the college and university management platforms or personal information in e-commerce or social media systems is secure and not accessible to anonymous or unauthorised users. An easy way to do it is to implement an authentication-authorisation system in our the application . Now now, I know a lot of people are confused regarding the terms authentication and authorisation. Let's discuss what they actually are and how we can leverage them to make our systems secure.
Authentication: Authentication is the process of verifying the identity of a user. It ensures that the claimed identity is legitimate and accurate. In simpler terms, it answers the question, "Who are you?" Authentication is often based on credentials such as usernames and passwords, but it can also involve more advanced methods like biometrics, two-factor authentication, or token-based authentication. If we consider a real life example, in our colleges or universities, the security guards at the gate ask us for the identity card, which confirms our credentials.
In the context of a web application, when a user logs in, the system authenticates them by validating their provided credentials against stored credentials in a database. If the provided credentials match the stored ones, the user is considered authenticated and granted access.
Authorisation: Authorization, on the other hand, deals with what a user is allowed to do or access after their identity has been verified through authentication. Authorization involves defining and enforcing permissions and access levels based on the authenticated user's role or attributes. It answers the question, "What are you allowed to do?" Here if we consider a real life example, the security guards, despite letting us students into the college, don't allow us to go to the administrative block or the Director's office.
In a web application, once a user is authenticated, the system checks their authorization level to determine whether they have the necessary permissions to perform a specific action or access certain resources. This could include actions like viewing a page, creating, updating, or deleting data, or accessing certain features of an application.
So, authentication is about the identity of a user and the authorisation is about what a user, with a particular identity, is authorised to access in a system. For example on Facebook, you authenticate yourself using your username and password, but even if you are authenticated, you are not able to make changes to any other user's profile because you are not authorised to do so.
Now, the question is how do we create an authentication and authorisation system. We'll be using JWT based authentication system. JWT stands for JSON Web Token. So, what the system does is that it authenticates the credentials (i.e. Matches the given credentials with the credentials present in the database). If the authentication is successful, it generates an access token, which is a digitally signed and a secure token generated using an algorithm. This token is sent to the client side and if the client needs to access any protected resource of the server, it has to send this token with the request's authorisation headers. To enhance the security, two tokens, one access token and one refresh token are generated. Access token has a shorter lifespan and is blacklisted when that time expires and the refresh token has a comparatively longer lifespan and is used to renew the access token. I know it's a bit intricate, but let's try to understand it using a simple diagram that'd elucidate everything while making us visualise the things.
I feel, I was wrong when I said "A simple diagram". I should have said "A not so simple diagram". Anyways, let's try to break it down into simpler steps.
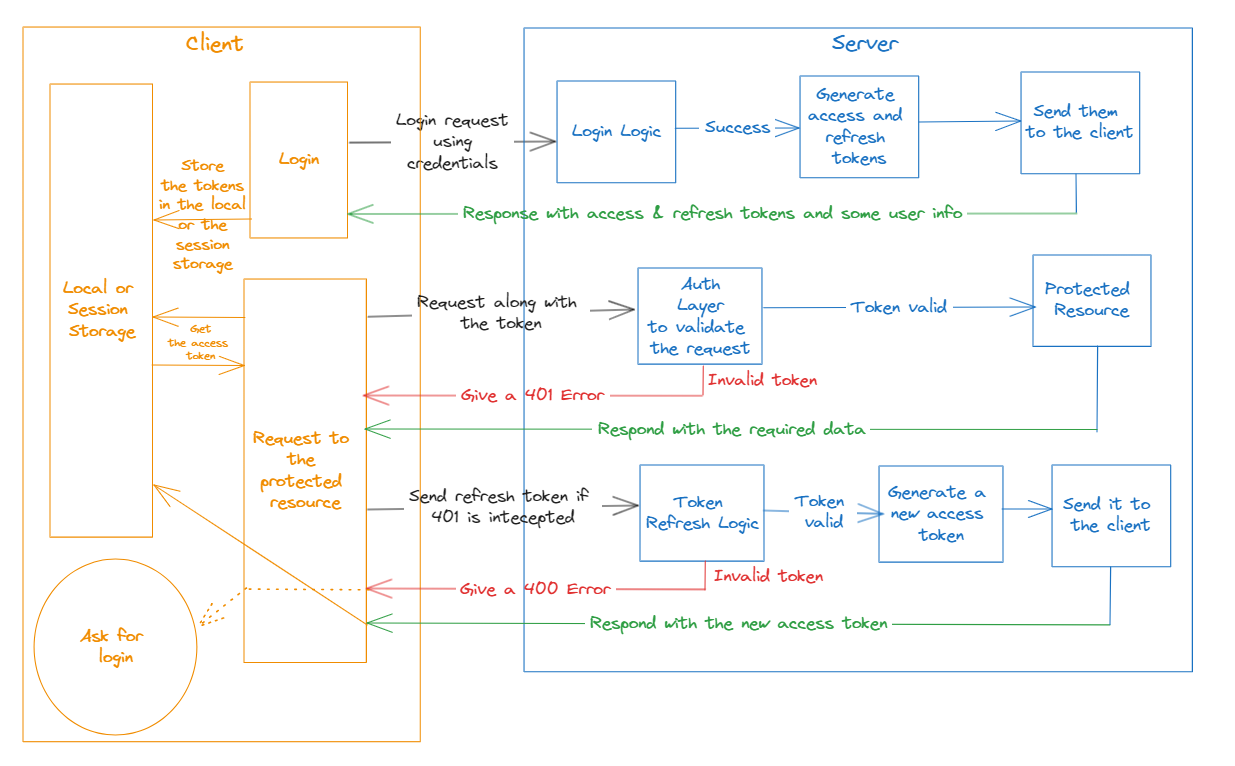
Login request: The customer sends a login request to the server using their credentials. The server generates access and refresh tokens, if the credentials are valid. The server sends the access and refresh tokens, along with some user information, maybe his username or email, to the client. The client stores the tokens and the information in local or session storage based on the requirements.
Request protected resource: The client makes a request to a protected resource on the server, for which it gets the stored access token from the local or session storage along with the access token. The server's authentication layer validates the access token. If the token is valid, the server responds with the requested data. If the token is invalid, the server returns a 401 error.
Refreshing the access token: In case a 401 error is intercepted on the the client side, it retrieves the refresh token from storage and sends the refresh token to the server. The server's refresh logic validates the refresh token and generates a new access token if it is valid. The server sends the new access token to the client. If the refresh token is invalid, the server returns a 400 error, which again can be intercepted and the needful, such as prompting the user to log in again.
I guess, that's enough of the theory, let's get started with the code to bring it all to life.
Let's go Django!
Let's quickly install the things we require to do this,
pip install django djangorestframework djangorestframework-simplejwt
django-admin startproject buildauthsystem
cd buildauthsystem
python manage.py startapp users
Let's add them to the installed apps in the settings.py file.
INSTALLED_APPS = [
'users',
'rest_framework',
'rest_framework_simplejwt'
]
Now, we need to configure JWT Authentication in the settings.py file
REST_FRAMEWORK = {
    ...
    'DEFAULT_AUTHENTICATION_CLASSES': (
        ...
        'rest_framework_simplejwt.authentication.JWTAuthentication',
    )
    ...
}
Let's quickly build views to generate tokens for a user.
from django.contrib.auth import authenticate
from rest_framework.views import APIView
from rest_framework.response import Response
from rest_framework import status
from rest_framework_simplejwt.tokens import RefreshToken
from rest_framework.permissions import AllowAny
from rest_framework_simplejwt.views import TokenRefreshView

class TokenObtainView(APIView):
    permission_classes = [AllowAny]

    def post(self, request, *args, **kwargs):
        username = request.data.get('username')
        password = request.data.get('password')

        if not username or not password:
            return Response({'error': 'Username and password are required.'}, status=status.HTTP_400_BAD_REQUEST)

        # Authenticate the user
        user = authenticate(username=username, password=password)

        if not user:
            return Response({'error': 'Invalid credentials.'}, status=status.HTTP_401_UNAUTHORIZED)

        refresh = RefreshToken.for_user(user)
        access_token = str(refresh.access_token)

        return Response({
            'username': user.username
            'access_token': access_token,
            'refresh_token': str(refresh)
        }, status=status.HTTP_200_OK)

class TokenRefresh(TokenRefreshView):
    pass
Import required modules from Django and Django Rest Framework.
Create TokenObtainView Class:
Define a class
TokenObtainViewthat inherits fromAPIView.Set
permission_classesto[AllowAny], allowing any user to access this view.Implement a
postmethod to handle POST requests.Extract 'username' and 'password' from the request data.
Check if both 'username' and 'password' are present; otherwise, return a bad request response.
Use
authenticateto verify the user's credentials against the Django built-in user model.If authentication is successful, generate a refresh token and obtain the corresponding access token.
Return a response containing the username, access token, and refresh token.
Create TokenRefresh Class:
Define a class
TokenRefreshthat inherits fromTokenRefreshView.No additional customization is done in this example; it inherits the default behavior from
TokenRefreshView.
Explanation of TokenRefreshView:
TokenRefreshViewis part of therest_framework_simplejwtlibrary and provides the default functionality for refreshing an access token using a valid refresh token.It allows clients to request a new access token without providing their username and password again.
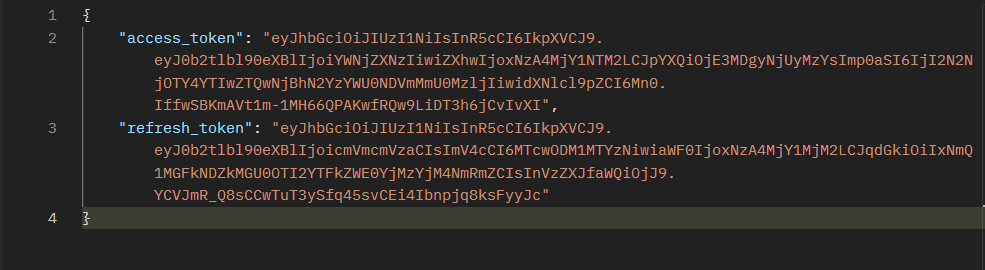
Now, when you map your views with the URLs and hit the login URL, you'll get the following response.
Now, if we want to restrict a resource for only logged in users, we can implement permission classes on that view, which handles the authorisation and does not allow unauthenticated users to access the resource.
from rest_framework.views import APIView
from rest_framework.response import Response
from rest_framework import status
from rest_framework.permissions import IsAuthenticated

class GetUserProfile(APIView):
    permission_classes = [IsAuthenticated]
    # Rest of the logic to fetch the user details and return to the user
Now, if you try to access this route without giving a token, it'd give the following response.
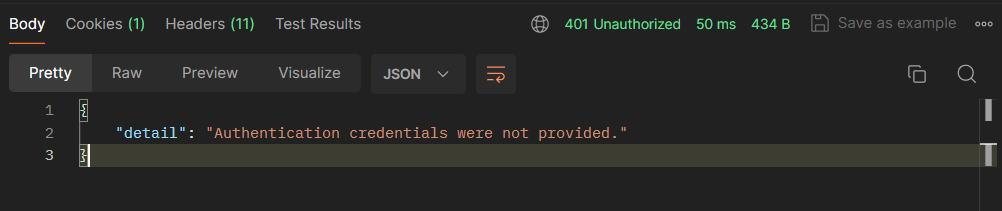
We can intercept this 401 error and do the needful on the client side.
In conclusion, while this article provided a foundational understanding of JSON Web Tokens (JWT) and explained how to generate access and refresh tokens using Django and Django Rest Framework, it's only an introduction to JWT Authentication in a Django ecosystem. JWTs offer a versatile solution for secure authentication and data exchange, and there are many advanced features and customization options that you can explore. More than the code in this case, I feel, that acquiring a solid understanding of how JWT Authentication works in any ecosystem and how we can leverage it to secure our systems. I guess, the diagrammatic explanation of the working of both access and refresh tokens has made the working logic tacit.
You can reach out to me about any queries on LinkedIn.
Keep Learning, Keep Sharing, Keep Djangoing!
Peace, Dot!


